This page is part of the MakerScanner series (<< previous in series | next in series >>)
Installation
Windows
Download the installer and you're good to go! Once it's installed, skip down to the Your First Scan section.
If your camera is not working, you might need to install drivers for your PS3 Eye camera. Grab the CL-Eye Driver and run it. Update: some users have had trouble with the latest version of the drivers, so if you run into issues you might want to try version 4.0.1.
Linux
When you see
text like this
it means you should type it into your Linux terminal.
Dependencies
You need to install a few packages that the code uses before we get started. If you're using Ubuntu this will do it:
sudo apt-get install libopencv-dev libhighgui-dev libwxgtk3.0-dev libcvaux-dev
If you're not on Ubuntu, you need to install the development libraries for:
- OpenCV
- wxWidgets
Download and install
Download the code: [http://www.makerscanner.com/files/makerscanner-0.3.2.tar.gz]
On the terminal, unpack it:
tar -xzvf makerscanner-0.3.2.tar.gz
Change into the code directory:
cd makerscanner-0.3.2/
Run configure:
./configure
This will produce a bunch of text. If all goes well, you should see something like this at the bottom:
config.status: creating Makefile
config.status: creating config.h
config.status: executing depfiles command
If things didn't work out, you probably don't have the right dependencies installed. Check the above section to make sure you covered them all.
Now we're ready to compile:
make
and finally install:
sudo make install
Your first scan
Plug the camera in and start it up!
makerscanner
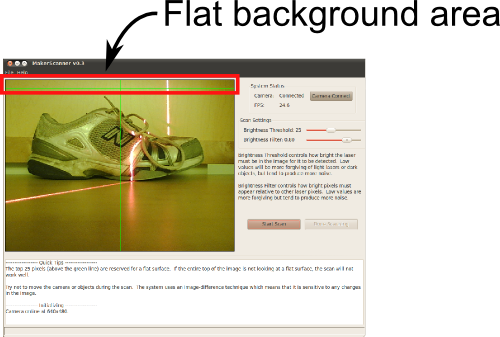
If all goes well, you should see something like this:

Note: make sure your laser is oriented as vertically as possible. Use the line in the center of the display to help you align it.
There are two things to keep in mind when you are scanning:
- There must be a flat background in the top 25 pixels of the image (above the horizontal green line). This gives us a reference to compute the 3D data off of.
- The image must not move (very much) during the scan. We use an image-difference technique to detect where the laser is, which gets all confused if the camera gets bumped during a scan.
Once you've got your object ready, with the top 25 pixels against a flat background, click Start Scan. Decide what you want to call your scan and press Save.
A box will come up, asking you to cover the laser beam. Press Done with the laser covered.

Next, we need to know how far away your reference surface is. There are two ways to do this:
- point the laser straight (it should slip into a groove in the plastic) and we'll take a picture and figure it out from there
- you can measure it yourself

Here I'll assume we chose option (2) and just typed in 42 cm. Press Done.
Now we're scanning! Be careful to keep the camera from moving and sweep the laser back and forth. You'll see where we've detected the laser show up on the image. It takes about a minute to scan a full image at good resolution. You really want the whole object to be covered in blue.
This is not enough data to get a good scan:

This scan is looking much better:

Once your image is well-covered in blue, hit Done Scanning. Congratulations! You've 3D scanned an object!
Head over to the post-processing page to take a look at it!
This page is part of the MakerScanner series (<< previous in series | next in series >>)